I do most of my analysis now on cloud infrastructure as much as possible. The primary advantages are:
- I can quickly scale compute resources as needed for large problems
- I can access unlimited cheap storage (e.g. S3) as needed
- My hardware doesn’t go obsolete - as processing, disks, and gpu get cheaper they become available for rent as needed
- I can quickly deploy advanced technology like hadoop clusters, Kubernetes, etc
- I can get by with a cheaper and lighter laptop as it’s only acting as a thin client
Introduction
One concern using the cloud is security - it’s easy to quickly create an ubuntu server on AWS, but there’s always the worry that you’ll leave an open port or that a service will become vulnerable and you’ll be too slow to apply the patches. A great way around this is to make use of a Bastion Node - a server that has very limited access (generally ssh only) and only serves to provide access to the rest of the internal systems. By only running an ssh server you are dramatically reducing surface area for potential attacks, and reducing the necessary maintenance overhead of keeping things up to date. Internal servers can be much more fully featured and more open to each other, and you can be much less concerned about intrusions. A downside is that you now have to go through this bastion node to access internal servers, but with a properly configured ssh config file this becomes nearly transparent.
An overview diagram of what we’ll setup is below:
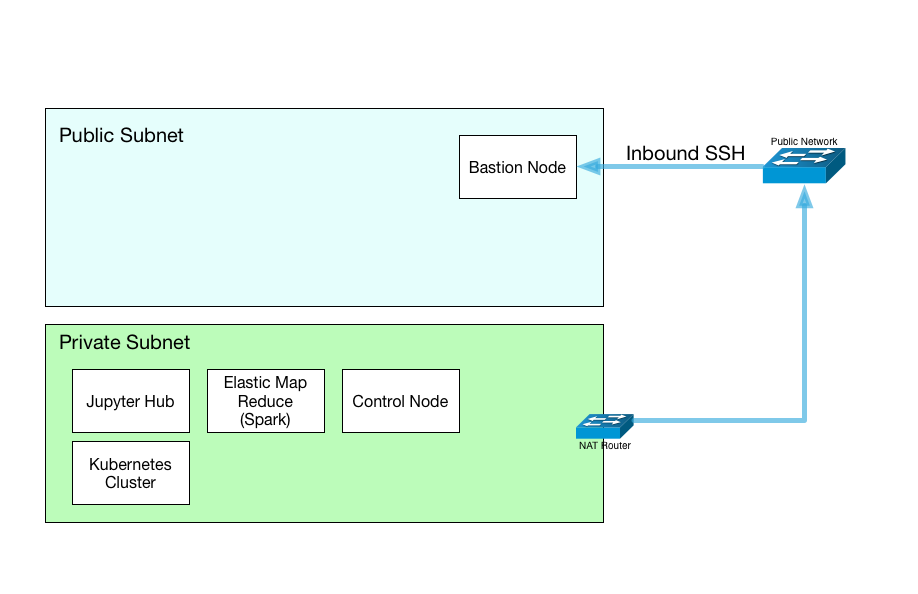
The primary components:
- Bastion node for access the network, from there we can connect to any server in our private net.
- Jupyter server for web-based analysis in Python, R, Julia or others.
- A Kubernetes cluster will be deployed for quickly launching services.
- EMR Hadoop environments can be connected for Spark other services on demand.
- A control node for will be created to configure everything.
- A NAT router is added to provide internet access to the internal nodes, for security updates, github access, etc
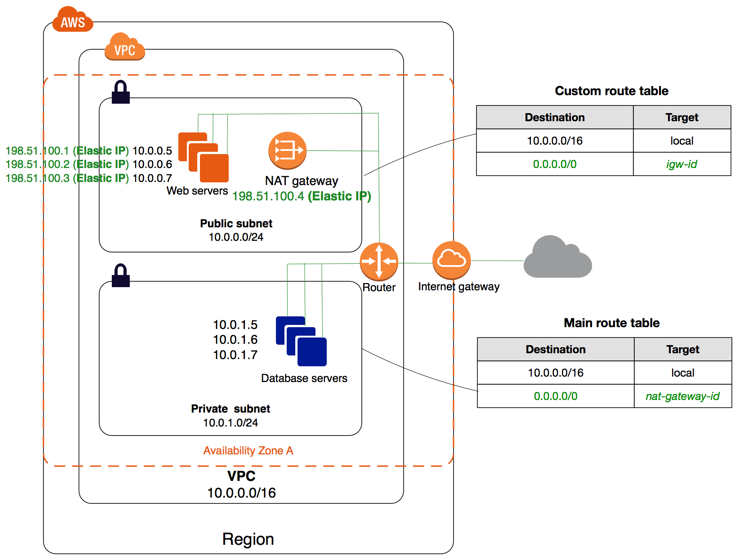
Amazon Virtual Private Cloud creation
We’ll initially be following the AWS VPC guide
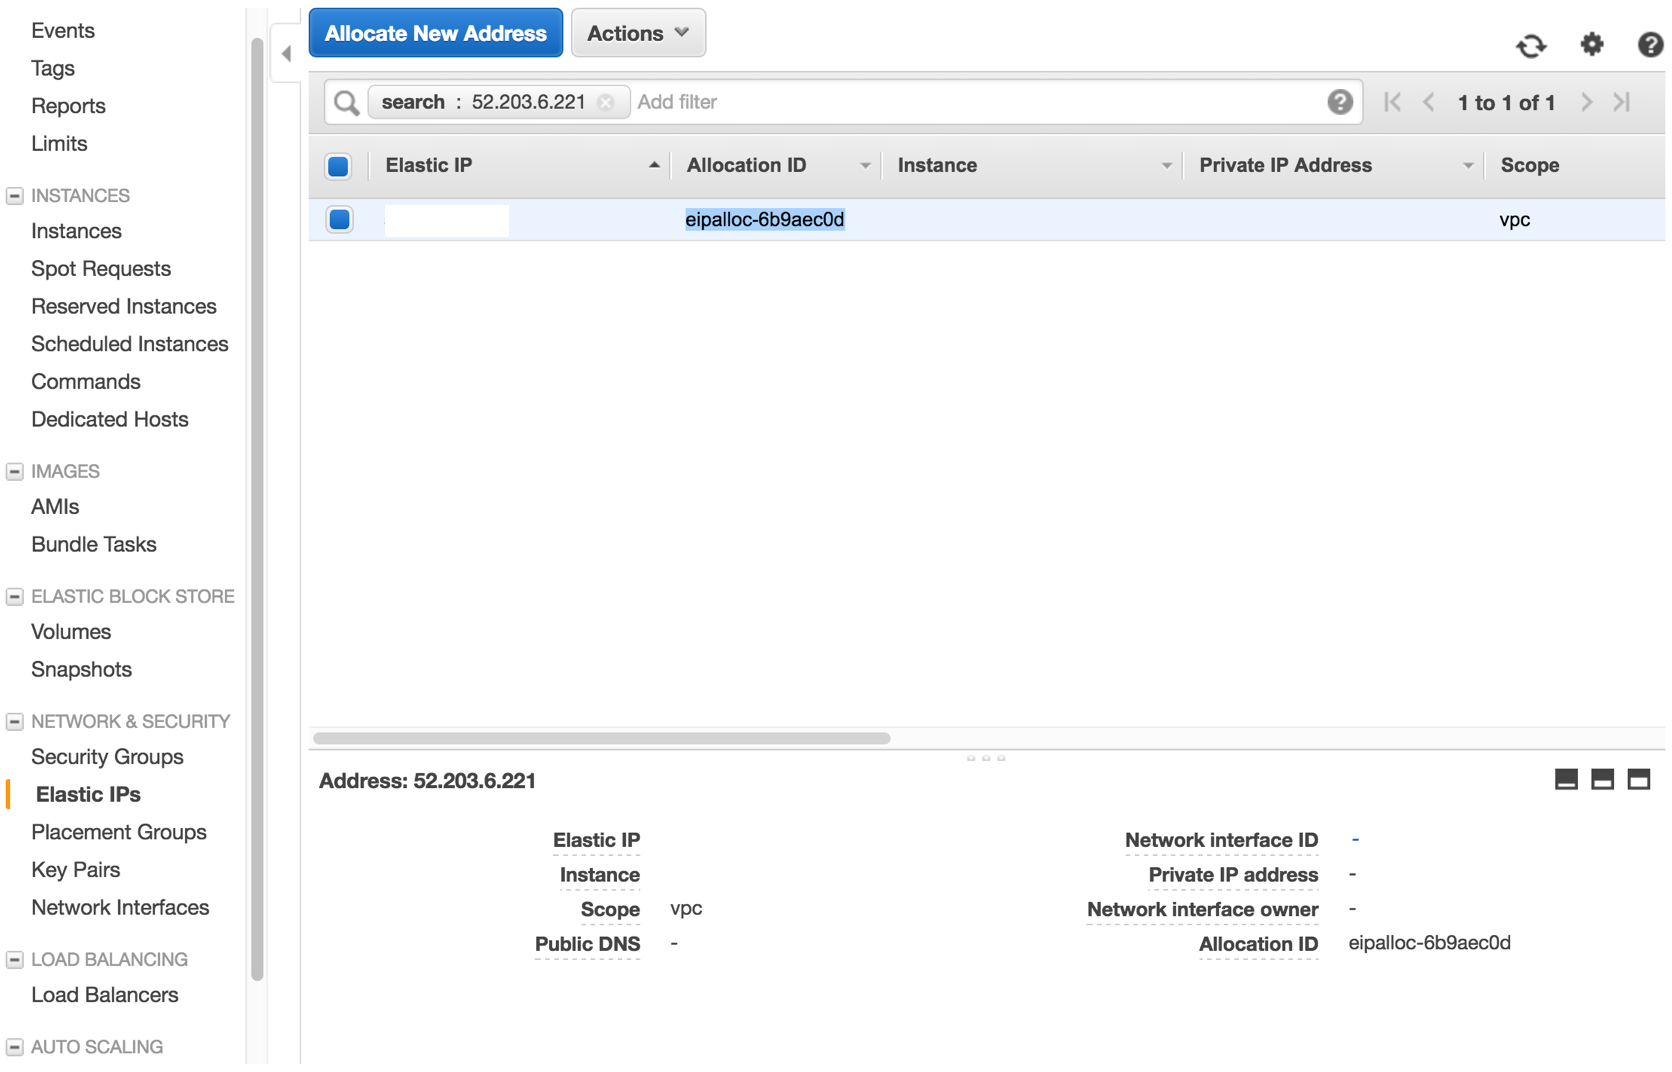
First, create an elastic IP to serve as the public IP of our NAT gateway
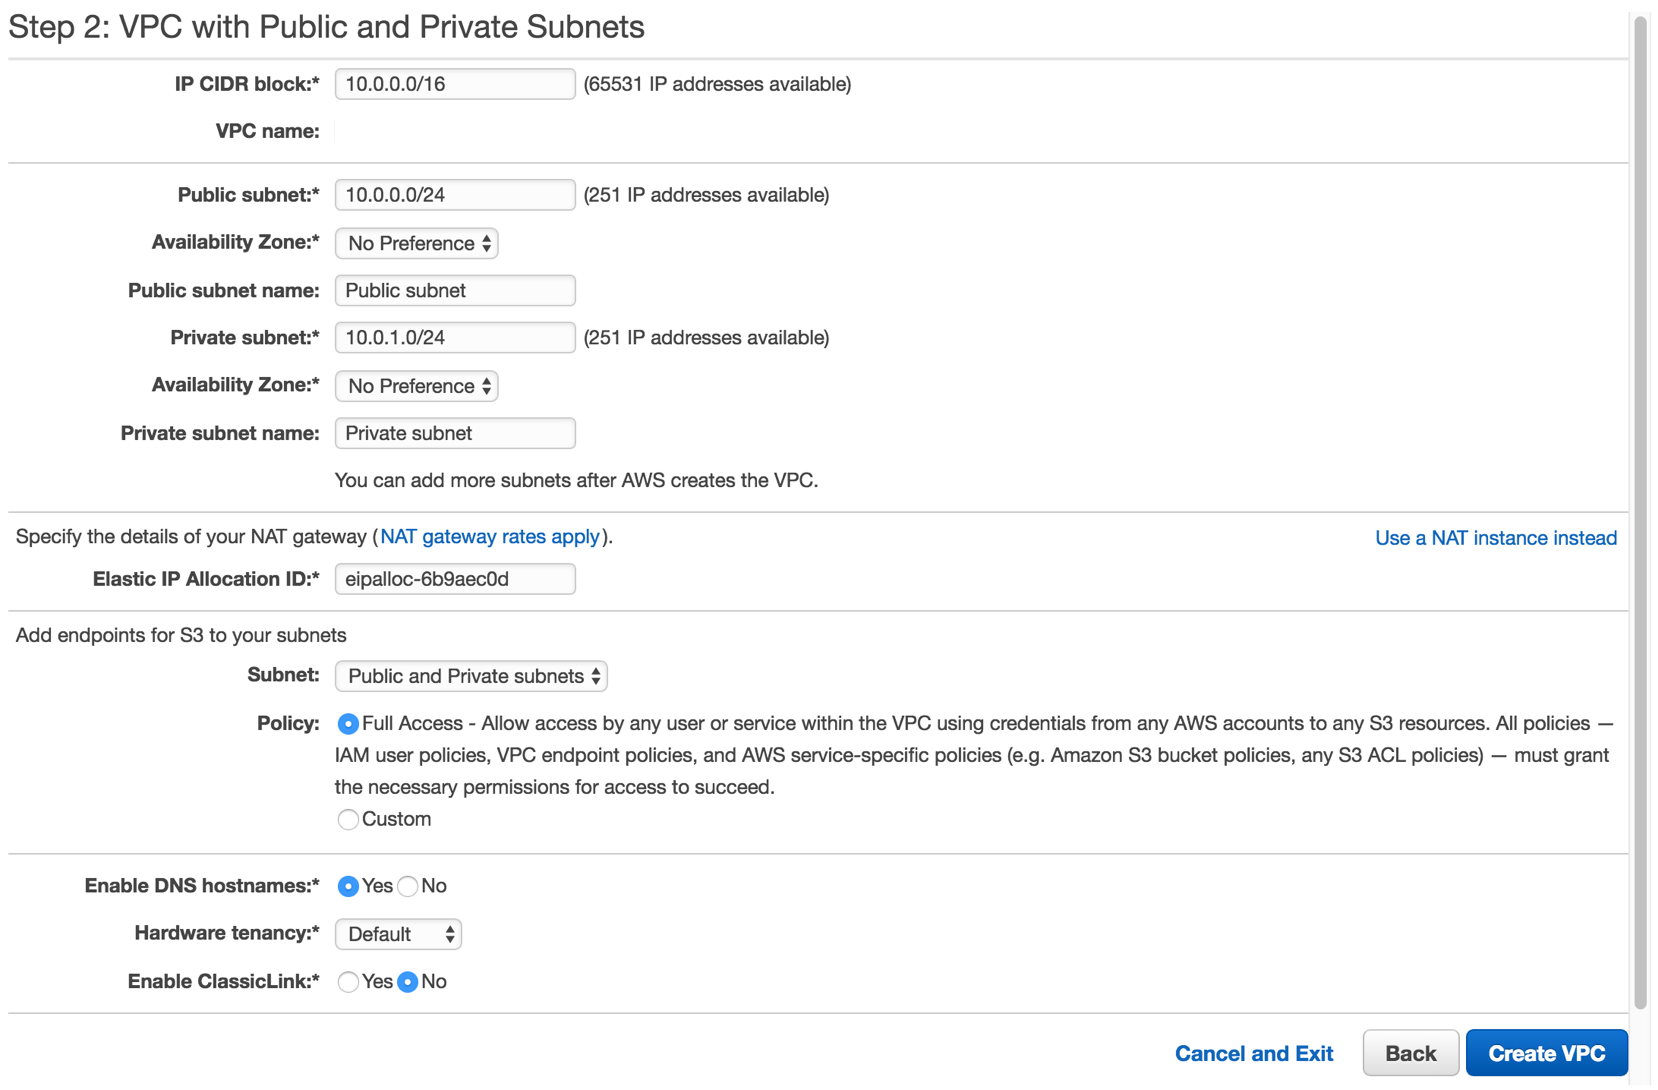
Next, create a virtual private cloud (VPC) with name of your choice (here, “ACS Network”), and 2 subnets, one public and one private. Choose the elastic IP created above, and enable S3 and DNS support.
Bastion Node creation
Now we’ll create our entry point into the system, the Bastion Node. This VM doesn’t need to be very high spec as it will only be serving as a low-traffic network gateway. Most data should likely be going through S3 or other Amazon services, so the bastion will mainly be for ssh tunnels enabling jupyterhub connections, VNC desktops, etc as needed.

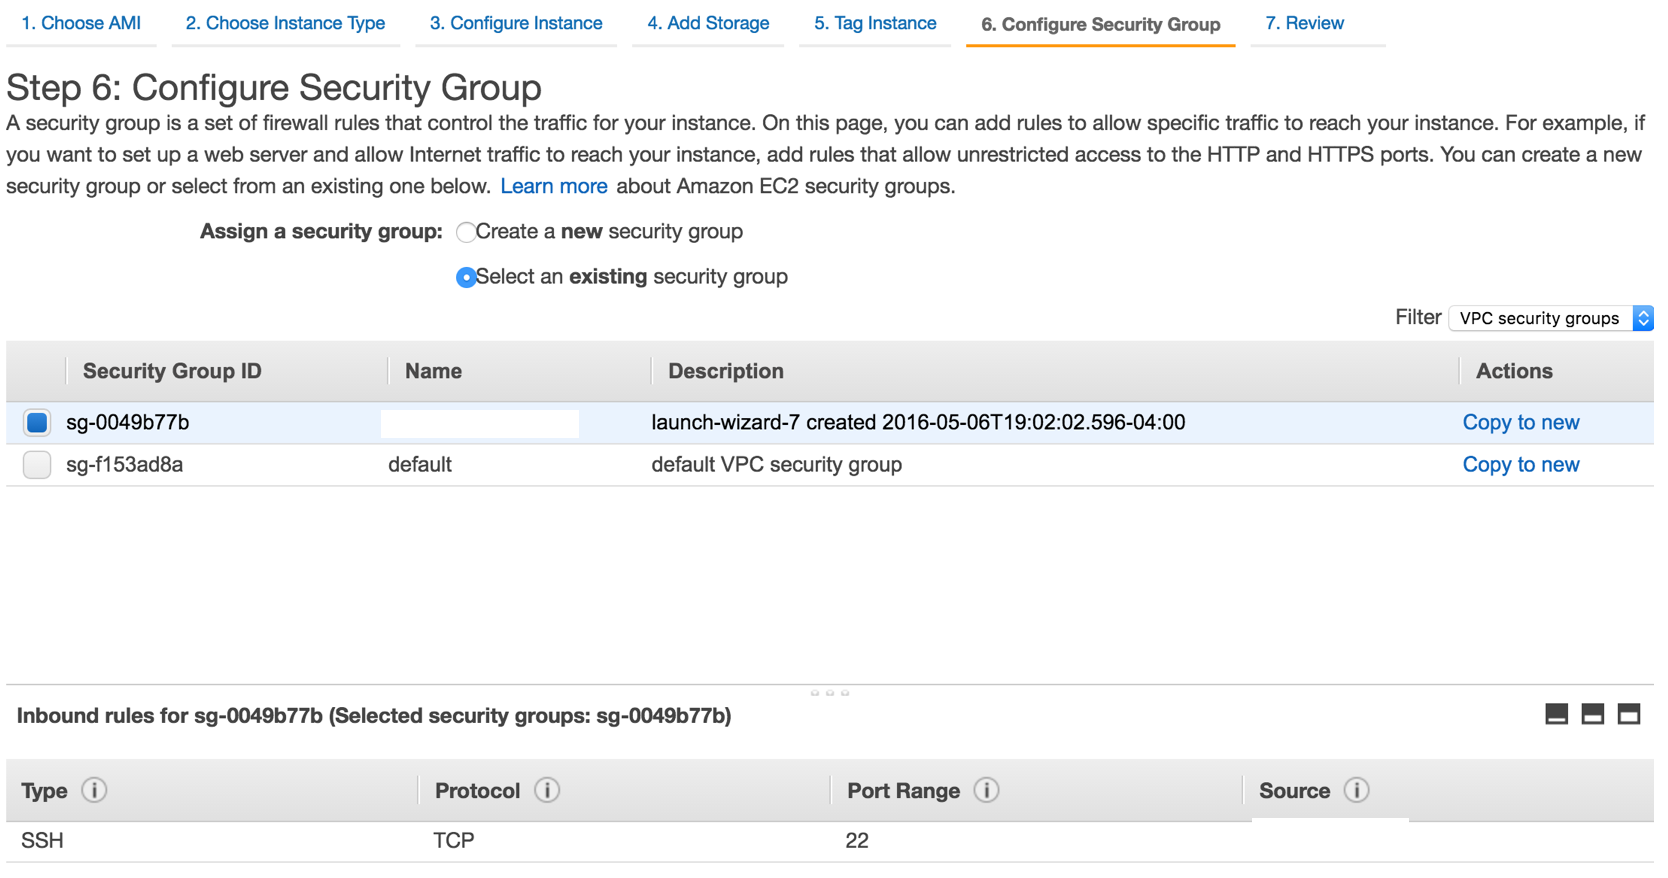
Note that I have a security group locking down ssh access to a single IP range, corresponding to my home network. This is optional - just locking down access to port 22 for ssh is sufficient.
Bastion node configuration
Right now we’re only configuring for a single user, I’ve added an administrator ssh key and will use
that key to launch, and then will add a local user, ecarlson, for myself.
$ ssh -i <ssh-private-key> ubuntu@<bastion-ip>
$ sudo useradd -m ecarlson
Next, become the new user and create an authorized_keys file containing the public key for the
new user. This should be a different key than you used for the bastion node admin - this user
won’t have sudo access so will be a limited user on the bastion node. Note that we didn’t set a
password for the user - we’ll only be using ssh key for access, which is a more secure method,
especially if you followed good practices and also set a password on the key. This follows 2-factor
security of something you have (ssh key) + something you know (ssh key password).
$ sudo su - ecarlson
$ mkdir .ssh
$ vi .ssh/authorized_keys
If we were adding additional users we could later add an internal LDAP server
which could have public ssh keys registered. In that case we would configure our bastion node
to authenticate against that LDAP, and could set quotas so users couldn’t store files to the
bastion node. We would also change the sshd_config file in /etc/ssh to remove ability to
login with a password.
This is all the configuration needed for the bastion node - as it’s only running ssh, the only configuration needed is to add users.
Local SSH Configuration
For convenience I maintain a ssh configuration file to make it easy to keep track of ssh tunnels and required identities. Here’s a snippet for our bastion server, and for connecting to a control server that we’ll create next.
Host bastion-panda
  ForwardAgent yes
  Hostname <bastion-public-ip>
  IdentityFile ~/.ssh/ecarlson_key
  User ecarlson

Host panda-*
  ForwardAgent yes
  ProxyCommand ssh -q bastion-panda nc -q0 %h 22

Host panda-control
  Hostname <control-node-internal-ip>
  IdentityFile ~/.ssh/ecarlson_key
  User ecarlson
With this configuration I can now connect to the bastion node
$ ssh bastion-panda
Or can connect to any internal server with
$ ssh bastion-control
Which will tunnel through my bastion node and connect to the internal server, using the specified ssh key.
Comments
comments powered by Disqus